The body panels of many modern cars are made out of plastic because it does not rust and is more moldable than metal. Plastic is also much more lightweight than metal, meaning that a vehicle’s fuel efficiency increases when more of the vehicle is made from plastic.
You’ll typically find plastic on your car in your bumpers, fenders, door handles, and mirrors, and sometimes even body panels like doors and roofs. While it might seem simple to paint over blemishes in these areas at first, there are actually several steps required to paint automotive plastic, including cleaning, sanding, priming, and painting.
Whether you’re looking to increase its value in order to sell it or you just want it looking great while you drive around town, learning to paint your own car is an important skill to have.
This article will walk you through how to paint automotive plastic so that you can get your car looking good as new in no time!
Table of Contents
Before You Begin

You’ll want to be working somewhere where dirt will not fall into the paint while you’re painting, so choose to work either in your driveway on a cloudy, dry day or in your garage if it’s clean enough.
You’ll also need to make sure that you are wearing appropriate protective equipment, especially if you are working in an enclosed space. Be sure that you’re set up with plenty of gloves and N95 masks so that your airways and hands are protected.
Materials Needed
- Screwdriver
- Masking Tape
- Car wash detergent
- Sponge
- Microfiber cloth
- Rubbing alcohol
- Wax and grease remover
- 800 grit sandpaper
- Gloves
- N95 masks
- Spray primer for plastic
- Spray paint for plastic that matches the color of your car
- Spray clear coat
Remove Plastic Parts from Vehicle
The first step in painting automotive plastic is to remove whatever plastic parts need painting from the vehicle itself. This is important, as the process of painting could mess up the rest of your car if you don’t remove the plastic parts before painting.
Use whatever tools you need, such as a screwdriver, to disconnect the plastic part from your car.
Once you remove the plastic part, you’ll need to set it on a surface on which you can work. Scraps of wood, or a table covered in plastic will work well.
If you can’t remove the plastic parts because they are too large or do not come off, have no fear! There are other methods that you can use to protect the rest of your car. Don’t feel the need to yank the part off with force, it’s also easy to protect your car with masking tape.
Wash the Area

The next step in painting is to clean all around the area that you’ll be painting. Use car wash detergent to scrub your car with a soft sponge or microfiber cloth, and rinse it with water. Make sure that you remove all particles of dirt and dust from the surface you’ll be painting.
If dirt or dust is left on the surface of the car while painting, it could add a strange texture to the surface of the car, so it’s essentially to clean the area more thoroughly than you think you need to.
Apply Masking Tape
If you can’t remove the plastic part of your car, the next best option is to apply masking tape around the area you’ll be painting so that the paint does not get everywhere on your car. Take the tape and apply it all around the area you’ll be painting, applying as much as you need to in order to protect the rest of your vehicle.
Apply Rubbing Alcohol and Grease Remover
At this point in the process, you should put gloves on to protect you from the chemicals that you’ll be working with. You may also want to wear an N95 mask while using the spray primer, paint, and clear coat, as it can be toxic if you’re working in an enclosed space like your garage.
An important step in painting automotive plastic is making sure that the plastic is free of grease. In order to do this, first rub the area with rubbing alcohol and rinse it clean. Then, take some wax and grease remover and rub it over the surface of the area you’re planning to paint.
Use Sandpaper

For this step, we’ll use a wet sanding technique to create a texture in the surface of the plastic that the paint will stick to. Take some 800 grit sandpaper and get both the sandpaper and the surface of the car wet with water.
Then, move the sandpaper in circles across the entire area that you intend to paint. The sandpaper will add texture to the plastic parts and make the paint stick to the area better.
Apply Primer
First, shake the primer bottle for as long as the instructions say, and test it on a piece of cardboard or plastic. Make sure that the spray is coming out evenly and not leaving globs of paint. You should be spraying from about a foot away from the surface.
After you sand the area, use your spray primer to prime the entire area that you’ll be painting, being careful not to spray past the masking tape if the part is still on the car.
Apply two coats of primer five minutes apart and let them dry for at least 40 minutes, or whatever the instructions on the can say.
After the primer dries, you can sand it lightly again with 800 grit sandpaper to create a surface that the paint will stick to better.
Apply Paint
As with the primer, make sure that you shake the paint and test it on the same piece of cardboard or plastic to make sure the spray is coming out clearly. Again, you should be spraying from about a foot away from the surface.
Before applying paint, use the wax and grease remover again on the part to make sure that no grease from your hands or any other source has gotten onto the part.
Once you’ve applied the wax and grease remover, take your spray base coat in the color that matches your car and spray it on. You want to be about twelve inches away from the part and spray carefully with back and forth motions.
Apply three layers of paint, allowing each layer to dry for fifteen minutes between applications.
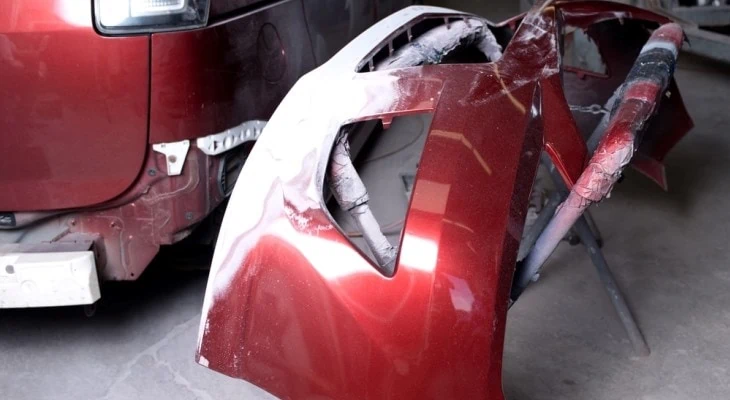
Apply Clear Coat
![]()
As with the primer and paint, always shake your clear coat and test it before you spray the part. The spray should be even, without lumps of paint in it.
Just like with the primer and paint, apply the clear coat in even, back and forth strokes, from about a foot away from the surface. The clear coat will require three coats with about twenty minutes for each coat to dry between applications.
After the last layer of clear coat, leave the part alone for at least twenty-four hours to dry completely.
In Conclusion
I hope this article has helped you learn to paint the plastic parts of your car effectively! As you can see, it’s a little more complicated than you might think, but it’s not so hard to do it properly. You’ll have your car looking perfect in no time!
Went to a body shop to ask about painting the bumpers for a Ford Escape 2007. The guy told me that those are not paintable that they would need to be replaced.
N95 masks don’t protect from vapor such as from paint. Consider using a volatile fluid type mask with replaceable filters.
Thanks for the article… gonna try it now