Soaring ceilings are a beautiful feature in a home! However, high ceilings can make painting the walls difficult! Is it possible to paint up high without a ladder? If you are scared of heights or do not own a tall ladder, keep reading to find out how to paint high places without a ladder.
In order to paint high places without a ladder, you will need a telescoping extension pole and a brush and roller that attach to the pole. Prepare the area for painting by placing drop cloths, taping the edges, and repairing the drywall. Start painting with the brush up near the ceiling, and work your way down the wall with the roller.
Table of Contents

Follow these simple directions to paint high walls and ceilings without using a ladder.
Materials Needed
Before you begin the project, assemble all the materials needed. Make sure the extension pole works with your roller and brush beforehand.
- Painters’ cap
- Drop Cloths (enough to cover the entire floor area near the walls)
- Telescopic extension pole
- Painters’ tape
- Angled paint brushes
- Paintbrush with a threaded handle
- Paint roller
- Paint
- Small tray or container for paint
- Spackling (if needed)
- Spackle knife
- Primer
Painting High Places Without a Ladder – Step by Step Guide
Once your materials are assembled, you can begin your project!
1. Prepare the Area
Painting with an extension pole can cause widespread paint splashes! Cover the entire area with drop cloths. Place them on the floors under the walls, and over any nearby furniture and light fixtures. Even if you think an item is too far away from the walls to get splashed by paint, cover it up!
Use the painters’ tape to tape all the baseboards and trim. It’s best to apply painters’ tape to clean trim, so you may need to wipe everything down and let it dry before you apply the tape.
2. Repair the Drywall (if needed)
If your home is anything like mine, there will be a few dings and dents in your drywall. Use the spackle to fill in the holes. Read the package instructions to find out how much drying time the spackle requires. Some brands of spackle will change colors, like from pink to white, when it is dry.
Once the spackle is dry, sand it until it is flush with the wall. For large holes, you may need a second layer of spackle or even a drywall patch. Once the area is repaired and dry, paint over the spackle with primer. Allow the primer to dry completely before you paint.
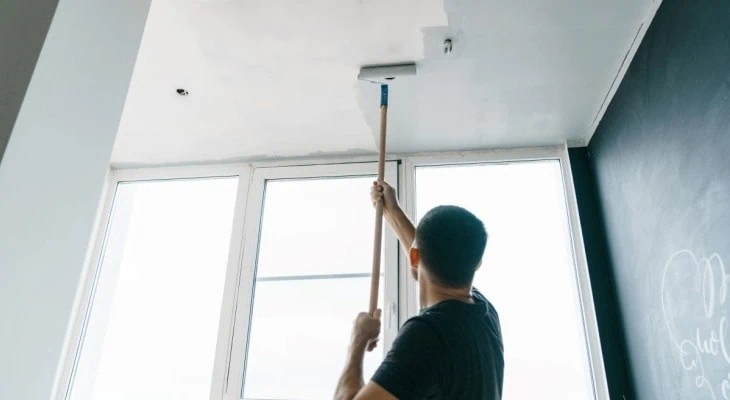
3. Paint the Top Edges First

Attach the paintbrush to the extension pole. If you do not have a threaded paintbrush, there are attachment kits available.
Stir the paint and fill the tray with enough paint to dip the bristles of the brush. Load the brush, but make sure it isn’t overly saturated. It shouldn’t be dripping excessively.
Carefully angle the brush towards the edge of the wall where it meets the ceiling. I recommend starting at the corner and working your way outward.
Keep a steady line by moving your entire body as you paint the edge. Fan the bristles for even coverage. You may need to go back and smooth out any brush marks. Finish the entire top edge this way.
4. Roll the Upper Part of the Wall
After the edges are painted, remove the brush from the extension pole, and attach the roller to the pole. Pour the paint into the roller tray, and load the roller with paint. Roll the excess paint off of the roller on the upper, sloped part of the tray.
Carefully lift the roller to the upper part of the wall. Paint from the top down, meeting the paint that you already painted along the top edge. Use the roller to smooth out any defined edges or brush marks.
Work from the top of the wall to the bottom. Make double-u shapes with the roller. Reload the roller with paint, as necessary. Stop once you’ve reached a part of the wall that you can reach without the extension pole, stop rolling.
5. Paint the Rest of the Trim
Use the paintbrush to paint along the rest of the reachable trim. Follow the same method you used to paint the top of the wall. Fan the bristles and make a smooth line along the edges.
6. Roll the Lower Part of the Walls
Remove the roller from the pole. Load the roller with paint. Make sure to remove the excess paint from the roller, then use the roller to apply the paint in large sweeping motions to the wall. Reload the roller with paint as necessary.
7. Apply a Second Coat of Paint
Allow the paint to dry completely, then repeat the painting process. Unless you are applying a major paint color change to your walls, two coats of paint is usually enough to cover the walls.
8. Clean Up!
You’re done! Clean your brushes, remove the paint and the drop cloths, and enjoy your new look!
What If I Really Need a Ladder?
There may be circumstances where this painting method may not work and you will have to use a ladder.
Reasons You May Need a Ladder
Here are a few reasons you may need a ladder to paint walls with high ceilings.
- Irregular angles – Some homes have ceilings with irregular corners or angles. Some of these may not be reachable with an extension pole.
- Extra high ceilings – Depending on the extension pole, and the ceiling height, you may need a ladder to reach the tops of the walls in rooms with high ceilings.
- Unsteady hands – Some people find it difficult to maintain an even edge with a pole and brush.
Best Extendable Ladders

In order to reach high places, an extendable ladder is usually the best choice. These ladders can expand, but also retract for easy storage. You can adjust the height to reach different areas. Here are a few of the best options!
Little Giant Ladder
The Little Giant ladders are well known for their innovative design and sturdy constructions. Not only does this ladder extend, but it can even be configured into different shapes, like A-frame, trestle, and step ladder.
The versatility of this ladder makes it great for any painting or home project. The downside? These ladders are more expensive than some other options.
Luis Ladders Folding Ladder
The Luis Ladders folding multi-purpose ladder is made out of aluminum. It has flexible, locking joints that allow it to be formed into many shapes, such as a scaffold or a leaning ladder. It folds down to a compact size for easy storage.
Gimify Telescoping Ladder
The Gimify telescoping extension ladder is another decent extension ladder option. It does not reconfigure into different shapes like the other ladders. However, it extends up to 15.5 feet tall and folds down for easy transportation and storage.
Final Thoughts
If you don’t have a tall ladder or heights make you nervous, you can still paint up high with the help of an extension pole! Assemble your materials, prepare the area, paint from top to bottom and enjoy your freshly painted walls!